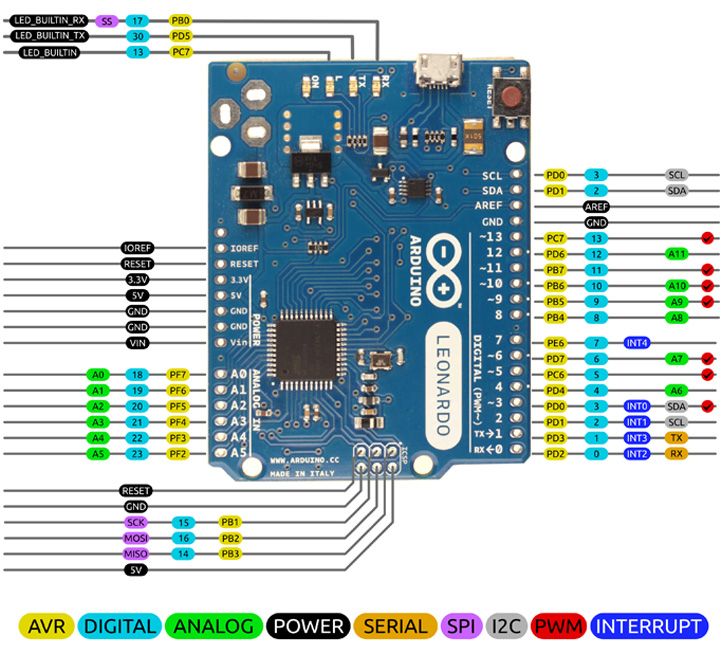
【 Leonardo #3】 Visualize Temperature& Brightness Data on your PC with Leonardo
아두이노/5. 아두이노-프렌즈 2019. 5. 28. 12:36【 Leonardo #3】 Visualize Temperature& Brightness Data on your PC with Leonardo
Using the Arduino Leonardo board, you can store data from a temperature sensor and a light sensor (CDS) in real time on a PC. This data can be visualized through the Processing IDE.
Let's have fun!
▶ Pre-learning :
1. 【 Leonardo #1】 Let's collect Temperature & Brightness data to PC! ☜ (Click)
▶ The Goal :
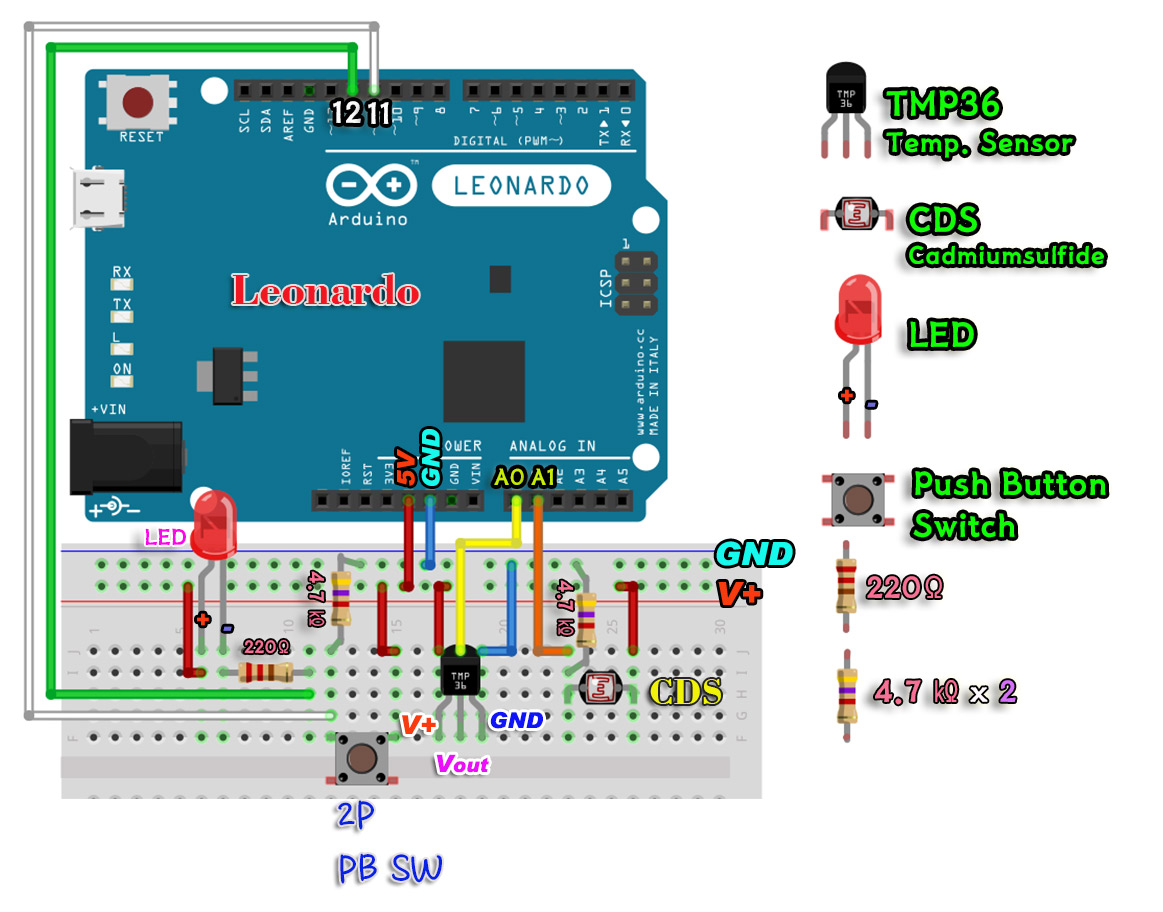
1. Screen size (width x height pixels): 500 x 500)You can connect and operate the temperature sensor (Tmp36) and the light sensor (cds) circuit on the Leonardo board.
2. Background color and lines: background (180), stroke (0), strokeWeight (5), fill (255, 20)You can send data from the temperature sensor and the light sensor to the notepad.
3. Circle drawing uses ellipse (x, y, diam, diam) functionTransmitted data can be visualized with processing IDE coding.
▶ 실습 목표 :
1. [ 레오나르도 보드에 온도센서(Tmp36)와 광센서(cds) 회로를 연결하고 동작시킬 수 있다.]
2. [ 온도센서와 광센서로 부터의 데이터 값을 PC메모장을 통해 전송 시킬 수 있다.]
3. [ 전송된 데이터를 엑셀 등을 이용해서 활용해 볼 수 있다 ]
4. [ 전송된 데이터를 프로세싱 IDE 코딩을 통해 보기 좋게 비주얼화 시킬 수 있다. ]
▶ Connection diagram :
( Click image to enlarge )

▶ 실행 결과 이미지 :
▶ 【Arduino Coding】 :
/* Leonardo board Transfer temperature & brightness data to PC with Leonardo board */
#include <Keyboard.h>
const int TEMP = 0; // A0 port
const int CDS = 1; // A1 port
const int LED = 12;
const int BUTTON = 11;
boolean lastBtn = LOW;
boolean currentBtn = LOW;
boolean running = false;
int counter = 1;
void setup ( ) {
pinMode(LED, OUTPUT);
Keyboard.begin();
Serial.begin();
}
void loop ( ) {
currentBtn = debounce (lastBtn);
if (lastBtn == LOW && currentBtn == HIGH) //Click the button
{
running = !running; // Change state values backwards
}
lastBtn = currentBtn; // Update button state values
if (running) // Writing data
{
digitalWrite(LED, HIGH);
// The millis () function returns the data in ms.
// So this function is used when the delay () function is not available
if (millis()%1000 == 0) // Execute if statement every second
{
int temperature = analogRead(TEMP);
int brightness = analogRead(CDS);
float mVoltage = temperature*5000.0/1024.0; //Converted to Celsius temperature
float TempDotC = (mVoltage - 500) / 10.0; //Converted to Celsius temperature
Keyboard.print(counter); // Data numbering before each line
Keyboard.print(",");
Keyboard.print(TempDotC); // Temperature data
Keyboard.print(",");
Keyboard.print(brightness); // Brightness data
Keyboard.print("\n");
counter++;
}
}
else
{
digitalWrite(LED, LOW);
}
}
// Generate subfunctions to prevent button bouncing
boolean debounce (boolean last)
{
boolean current = digitalRead (BUTTON);
if(last != current)
{
delay(5);
current = digitalRead(BUTTON);
}
return current;
}
▶ Arduino Code download :
( The code is zip compressed.)
---------------------------------------------------------------------------------
▶ 【Processing Coding】 :
/* Visualizing Temperature & Brightness Data on a PC */
PImage imgCDS;
PImage imgTemp;
PFont font;
import processing.serial.*;
Serial port;
String temp ="";
String br ="";
String data="";
int index=0;
void setup () {
size(800, 600);
background(255);
port =new Serial(this, "COM21", 9600);
port.bufferUntil('.');
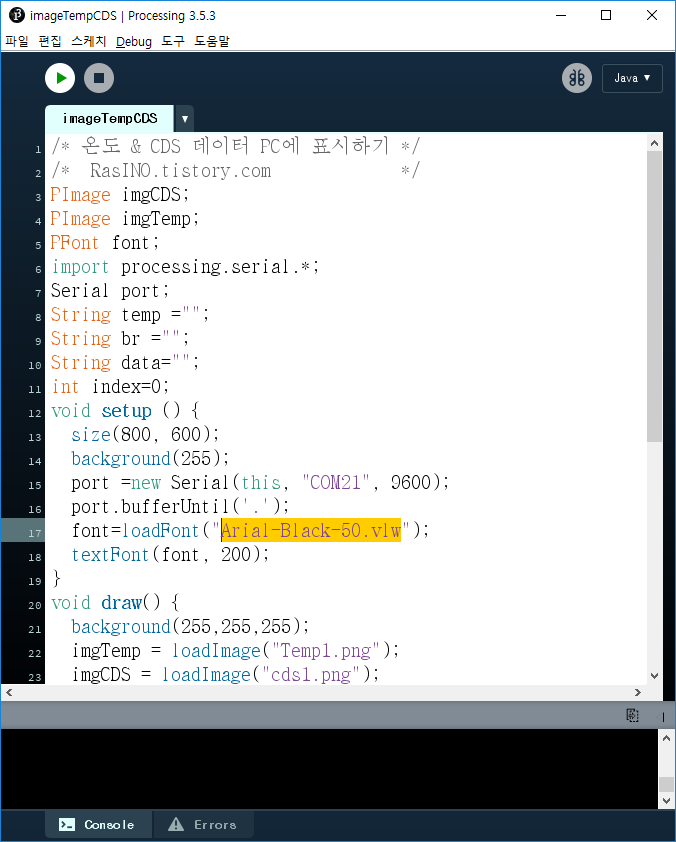
font=loadFont("Arial-Black-50.vlw");
textFont(font, 200);
}
void draw() {
background(255,255,255);
imgTemp = loadImage("Temp1.png");
imgCDS = loadImage("cds1.png");
image(imgTemp, 0, 0);
image(imgCDS, 450, 10, 250,250);
fill(150, 150, 10);
// textSize(80);
text(temp, 70, 500);
fill(50, 0, 200);
text(br, 450, 500);
}
void serialEvent(Serial port) {
data=port.readStringUntil('.');
data=data.substring(0, data.length()-1);
index=data.indexOf(",");
temp=data.substring(0, index);
br=data.substring(index+1,data.length());
}
▶ Download Processing code :
( The code is zip compressed.)
▶ Making Processing Font
(In order to use the window font on the processing output screen, it is necessary to convert the bitmap font into a usable bitmap font in the following process)
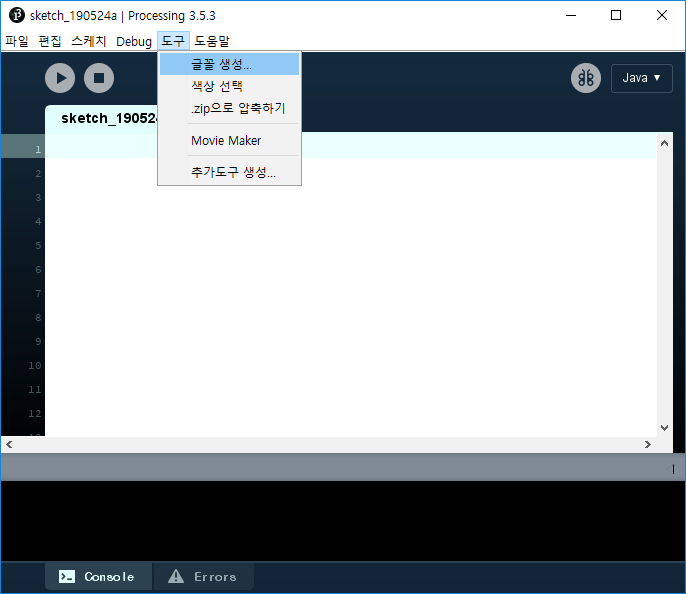
[Tools menu 》 "Create font" 》 Select font (size) 》 "Click OK" 》 Copy file name 》 "Paste into processing code]

▶ Video lecture :
(Look in full screen view)
(youTube)
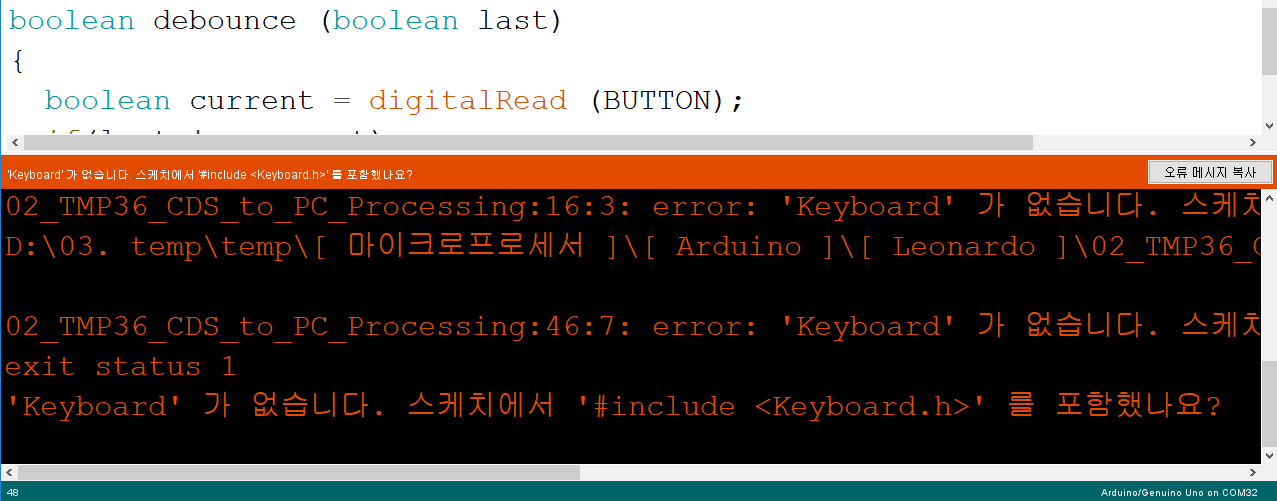
▶ Troubleshooting :
【 If you get the following error when running a sketch in the Arduino IDE: 】
If the above error appears, you need to confirm that you have selected the board as a Leonardo board from the board menu under Tools menu in the Arduino sketch. If the board selection is not selected by Leonardo, it will not be able to run even if it is compiled, and this will cause a 'Keyboard' error.
'아두이노 > 5. 아두이노-프렌즈' 카테고리의 다른 글
| 【 레오나르도활용#4】밤이되면 PC 강제 종료 시키기! (Leonardo) (0) | 2019.06.11 |
|---|---|
| 【 레오나르도활용#3】어두워 지면 PC 화면 잠그기 (Leonardo) (3) | 2019.06.10 |
| 【 레오나르도활용#3】 온도& 밝기값 PC로 비주얼화 하기 (Leonardo) (0) | 2019.05.24 |
| 【 Leonardo #1】 Let's collect Temperature & Brightness data to PC! (0) | 2019.05.15 |
| 【 레오나르도활용#2】 온도와 밝기값 PC로 수집하기 (Leonardo #2) (0) | 2019.05.15 |