안드로이드 스튜디오에서(with코틀린) 앱을 만들 때, 가장 많이 사용되는 기능 중 하나인 ViewPager2(뷰페이저 2) 사용법에 대해 다루어 볼게요.
뷰페이저란?
앱을 사용할 때 손가락으로 화면을 넘길 때 한 화면에서 다른 화면으로 넘어가며 보여주는 기능을 사용하려 할 때 사용되는 기능을 말해요.
1. New Project → Empty Views Activity를 선택하고 Title을 정해주세요. 여기서는 ViewPager2_fragment 라고 하였습니다. (페이지 구성을 fragment로 간단히 3개의 페이지로 구성해 볼게요)
이번 실습의 구현 결과는 아래와 같습니다.

프로젝트 구성은 아래와 같습니다.
처음, 프로젝트를 생성하고서, 비어있는 Fragment 페이지 3개을 아래처럼 만들어주세요.
res >> layout 폴더에서 마우스 우클릭(RMB) 하거나, app>>kotlin+java 폴더에서 RMB 한 다음,
우선, FragmentOne으로 이름을 적으면, 그 아래 Layout 이름도 자동으로 네이밍 되면서 Layout File도 자동으로 생성됩니다.
이런 식으로, FragmentOne, FragmentTwo, FragmentThree 이렇게 3개의 파일을 생성해 주세요.
그럼 아래처럼 각각 3개씩의 .Xml 파일과 클래서(.kt) 생성되어 있을 거예요.
우선, binding 기능을 사용하기 위해서 와래와 같이 바인딩 기능을 설정해 주세요.
▶ viewBinding 사용법
① build.gradle.kts (Module:app) 파일을 클릭하여 android { ... } 항목 속에 아래코드를 추가해 주세요.
viewBinding.isEnabled = true
android {
    namespace = "com.example.resourcetest"
    compileSdk = 34
    viewBinding.isEnabled = true
    defaultConfig {
        applicationId = "com.example.resourcetest"
        minSdk = 24
        targetSdk = 34
        versionCode = 1
        versionName = "1.0"

        testInstrumentationRunner = "androidx.test.runner.AndroidJUnitRunner"
    }
코드 추가 후 상단에 보이는 Sync Now를 클릭하여 적용시켜 주세요.(아래)
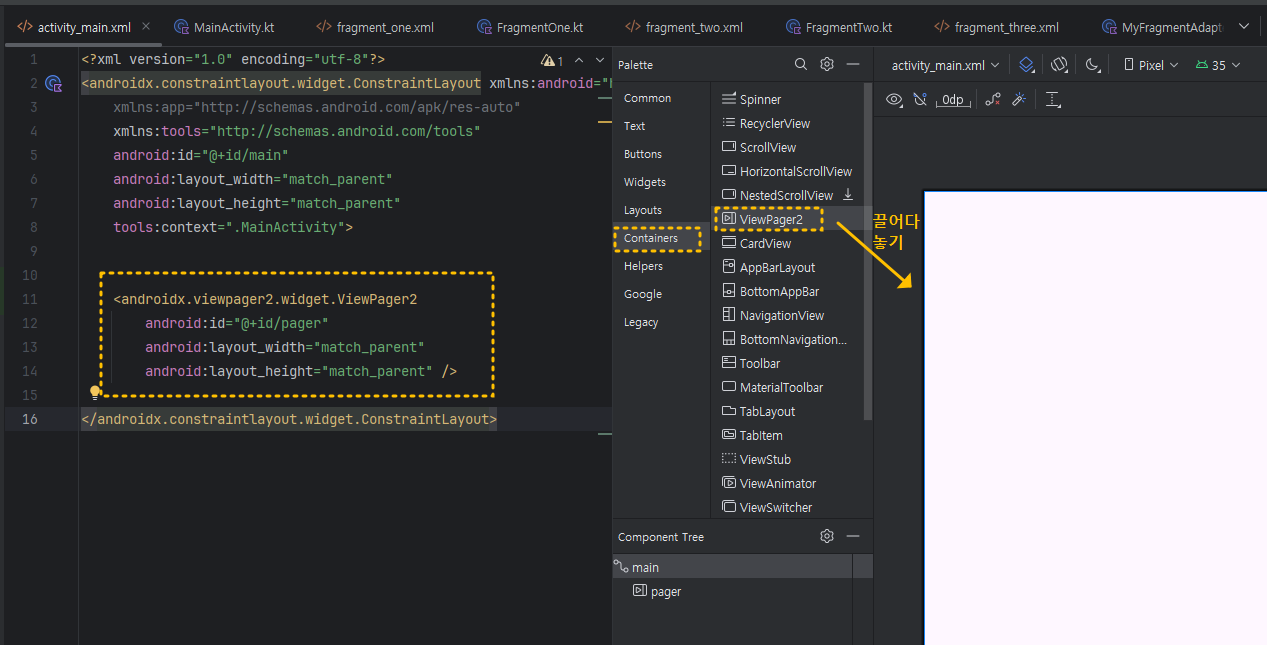
2. activity_main.xml 작성하기
아래와 같이 viewpager2 기능을 삽입하고 id는 "pager"라고 입력해 주세요.
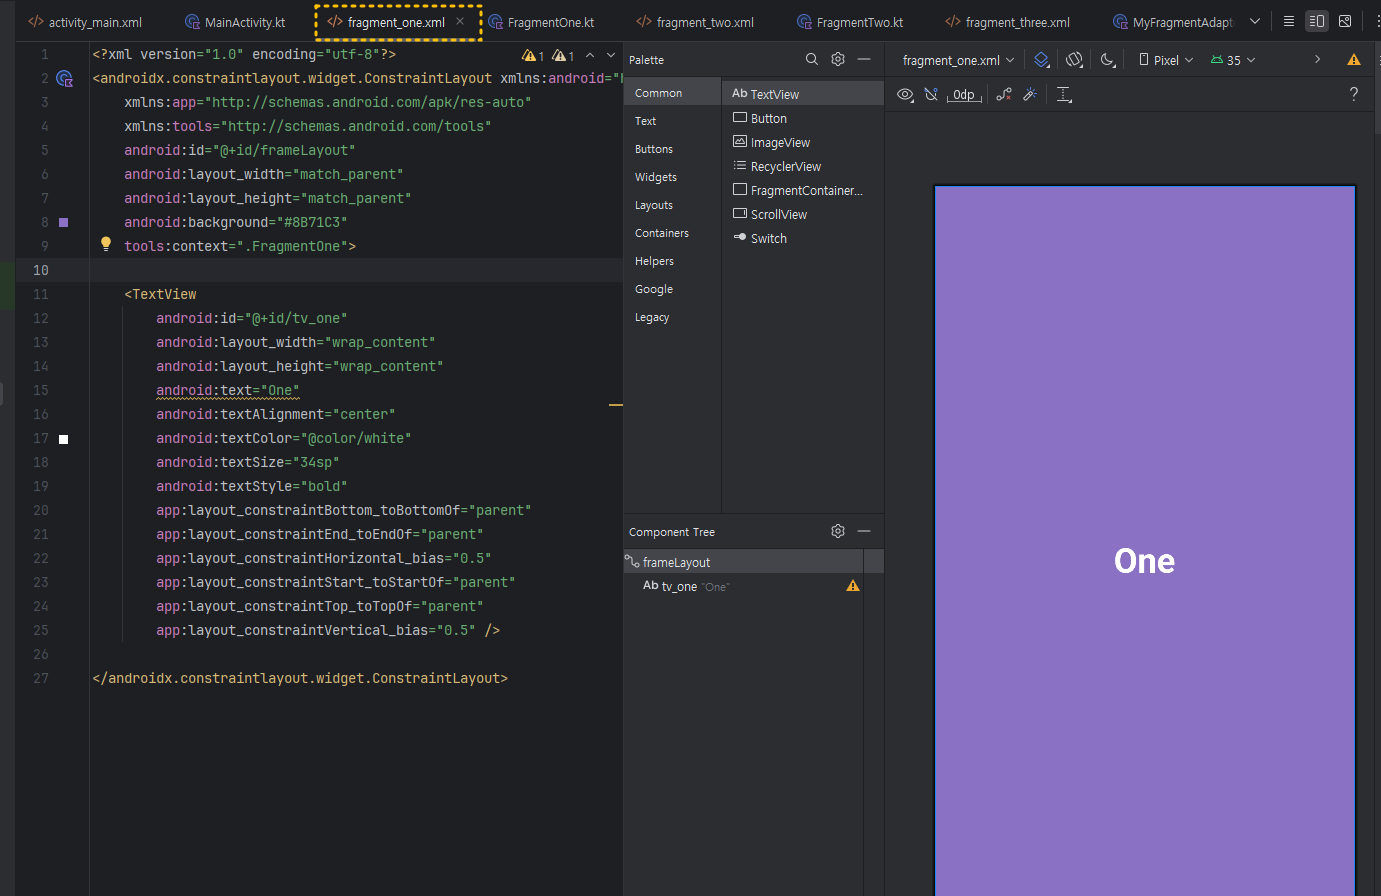
3. fragment_one.xml 과 fragment_two.xml , fragment_three.xml 파일 작성하기
아래처럼 적당한 색상과 배경으로 3개의 파일의 id를 서로 다르게 하여 작성해 주세요.
(단, 이번 실습에서는, FrgmentOne~Three.kt 클래스 파일의 내용은 사용하지 않기 때문에 자동 생성된 형태 그대로 두세요)
① fragment_one.xml
<code>
<?xml version="1.0" encoding="utf-8"?>
<androidx.constraintlayout.widget.ConstraintLayout xmlns:android="http://schemas.android.com/apk/res/android"
    xmlns:app="http://schemas.android.com/apk/res-auto"
    xmlns:tools="http://schemas.android.com/tools"
    android:id="@+id/frameLayout"
    android:layout_width="match_parent"
    android:layout_height="match_parent"
    android:background="#8B71C3"
    tools:context=".FragmentOne">

    <TextView
        android:id="@+id/tv_one"
        android:layout_width="wrap_content"
        android:layout_height="wrap_content"
        android:text="One"
        android:textAlignment="center"
        android:textColor="@color/white"
        android:textSize="34sp"
        android:textStyle="bold"
        app:layout_constraintBottom_toBottomOf="parent"
        app:layout_constraintEnd_toEndOf="parent"
        app:layout_constraintHorizontal_bias="0.5"
        app:layout_constraintStart_toStartOf="parent"
        app:layout_constraintTop_toTopOf="parent"
        app:layout_constraintVertical_bias="0.5" />

</androidx.constraintlayout.widget.ConstraintLayout>
② fragment_two.xml

<code>
<?xml version="1.0" encoding="utf-8"?>
<androidx.constraintlayout.widget.ConstraintLayout xmlns:android="http://schemas.android.com/apk/res/android"
    xmlns:app="http://schemas.android.com/apk/res-auto"
    xmlns:tools="http://schemas.android.com/tools"
    android:id="@+id/frameLayout"
    android:layout_width="match_parent"
    android:layout_height="match_parent"
    android:background="#4E8138"
    tools:context=".FragmentTwo">

    <!-- TODO: Update blank fragment layout -->
    <TextView
        android:id="@+id/tv_two"
        android:layout_width="wrap_content"
        android:layout_height="wrap_content"
        android:text="Two"
        android:textSize="34sp"
        android:textStyle="bold"
        android:textAlignment="center"
        android:textColor="@color/white"
        app:layout_constraintBottom_toBottomOf="parent"
        app:layout_constraintEnd_toEndOf="parent"
        app:layout_constraintHorizontal_bias="0.5"
        app:layout_constraintStart_toStartOf="parent"
        app:layout_constraintTop_toTopOf="parent"
        app:layout_constraintVertical_bias="0.5" />

</androidx.constraintlayout.widget.ConstraintLayout>
③ fragment_three.xml

<code>
<?xml version="1.0" encoding="utf-8"?>
<androidx.constraintlayout.widget.ConstraintLayout xmlns:android="http://schemas.android.com/apk/res/android"
    xmlns:app="http://schemas.android.com/apk/res-auto"
    xmlns:tools="http://schemas.android.com/tools"
    android:id="@+id/frameLayout"
    android:layout_width="match_parent"
    android:layout_height="match_parent"
    android:background="#B46C01"
    tools:context=".FragmentThree">

    <!-- TODO: Update blank fragment layout -->
    <TextView
        android:id="@+id/tv_three"
        android:layout_width="wrap_content"
        android:layout_height="wrap_content"
        android:text="Three"
        android:textSize="34sp"
        android:textStyle="bold"
        android:textAlignment="center"
        android:textColor="@color/white"
        app:layout_constraintBottom_toBottomOf="parent"
        app:layout_constraintEnd_toEndOf="parent"
        app:layout_constraintHorizontal_bias="0.5"
        app:layout_constraintStart_toStartOf="parent"
        app:layout_constraintTop_toTopOf="parent"
        app:layout_constraintVertical_bias="0.5" />

</androidx.constraintlayout.widget.ConstraintLayout>
4. MyFragmentAdapter.kt 파일 작성하기
아래와 같은 이름으로 어댑터 클래스를 하나 만들고 내용을 입력해 주세요.

MyFragmentAdapter.kt 파일의 <code>
package com.example.viewpager2_fragment

import androidx.fragment.app.Fragment
import androidx.fragment.app.FragmentManager
import androidx.lifecycle.Lifecycle
import androidx.viewpager2.adapter.FragmentStateAdapter

class MyFragmentAdapter(
    val fragments: List<Fragment>,
    fragmentManager: FragmentManager, lifecycle: Lifecycle): FragmentStateAdapter( fragmentManager, lifecycle
) {
    override fun getItemCount(): Int {
        return fragments.size
    }

    override fun createFragment(position: Int): Fragment {
        return fragments[position]
    }
}
5. MainActivity.kt 파일 작성하기
아래와 같은 코드로 MainActivity.kt 파일을 완성해 주세요.
package com.example.viewpager2_fragment

import android.os.Bundle
import androidx.activity.enableEdgeToEdge
import androidx.appcompat.app.AppCompatActivity
import androidx.fragment.app.Fragment
import com.example.viewpager2_fragment.databinding.ActivityMainBinding

class MainActivity : AppCompatActivity() {
    private lateinit var binding: ActivityMainBinding
    override fun onCreate(savedInstanceState: Bundle?) {
        super.onCreate(savedInstanceState)

        enableEdgeToEdge()
        binding = ActivityMainBinding.inflate(layoutInflater)
        setContentView(binding.root)

        val fragments : List<Fragment> = listOf(
            FragmentOne(),
            FragmentTwo(),
            FragmentThree()
        )
        val adapter = MyFragmentAdapter(fragments, supportFragmentManager, lifecycle)

        binding.pager.adapter = adapter
    }
}
6. 실행 결과 보기
여기까지 작성하고 에러가 나지 않는 다면, 실행해 보면 아래와 같은 결과를 보실 수 있습니다.
<실행 영상>
그럼, 다음 시간에 이번 실습에 이어서 기능을 더 추가해 보도록 할게요.
감사합니다. 좋은 하루 되세요.
'App개발 > Android_Studio' 카테고리의 다른 글
| 【AndroidStudio】 Kotlin Navigation Drawer(코틀린 네비게이션 드로어-사이드메뉴) 활용하기 (1) | 2024.12.02 |
|---|---|
| 【AndroidStudio】 ViewPager2(뷰페이저2) 실습 #2 <Tab Layout & 텍스트 에디트 추가하기> (2) | 2024.11.24 |
| 【AndroidStudio】 RecyclerView 실습 #3( Card View 기능 추가하기) (5) | 2024.11.15 |
| 【AndroidStudio】 RecyclerView 실습 #2( 기본 기능 익히기) (0) | 2024.11.07 |
| 【AndroidStudio】 Gradle Update 관련 에러 발생 시 해결 방법 (3) | 2024.11.05 |