▶ Fragment(프래그먼트) 정의
프래그먼트는 태블릿과 같은 대화면에서 효율적으로 화면을 구성하기 위해 생긴 구성요소입니다. 하지만 스마트폰과 같은 작은 화면에서도 효율적인 자원 활용과 메뉴 구성을 위해 종종 사용됩니다.
액티비티를 분할하여 화면의 한 부분을 정의하며 액티비티와 같이 레이아웃, 동작 처리, 생명주기를 가지는 독립적인 모듈인데요, 다른 액티비티에서도 사용할 수 있어 재사용성이 뛰어나며 액티비티 실행 중에 추가, 제거가 가능합니다.
프레그먼트는 액티비티의 일부분에만 배치되는 화면 및 동작을 조작하기 위한 객체입니다. 프레그먼트 매니저를 통해서 여러개의 프레그먼트를 조작할 수 있습니다. 레이아웃 xml 파일에서 다른 뷰들과 함께 배치될 수 있습니다.
▶ 프래그먼트 실습 : 버튼을 클릭하면 해당 프래그먼트 화면을 보여주기!
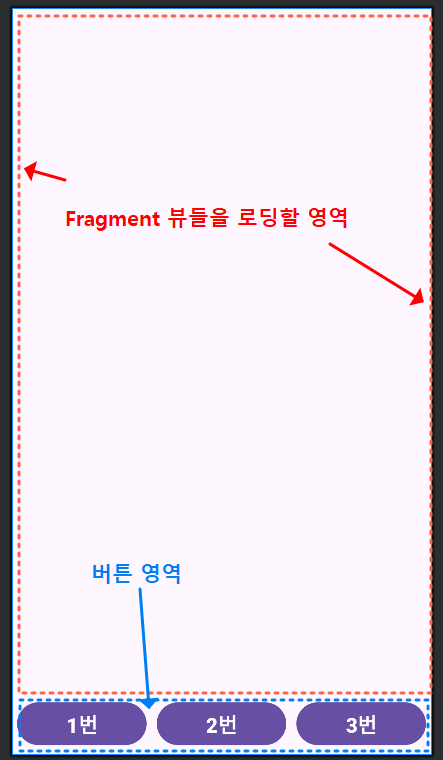
→ 3개의 버튼과 3개의 프래그먼트 화면을 각각 만들고 각 버튼들을 클릭하면 각각의 프래그먼트 화면이 로딩 되도록 합니다. 이때 메인 레이아웃(activity_main.xml) 화면에는 FrameLayout을 이용하여 화면을 fragment를 로딩할 View 영역과 버튼을 클릭할 영역으로 구분해서 만들어 봅니다.
→ 각각의 프래그먼트 화면을 아래처럼 단순하게 배경색을 변경하여 구성하고, 추후에 이미지를 넣거나 다양하게 응용하면 됩니다.

▶ 실행 결과
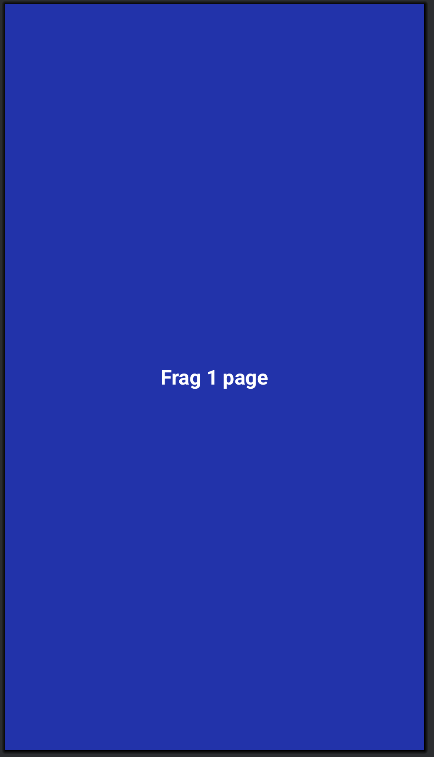
→ 1번, 2번, 3번 버튼을 클릭하면 아래와 같이 main_activity.xml 레이아웃 화면에 각각의 프래그먼트 화면이 로딩되도록 합니다.

▶ 코드 구성
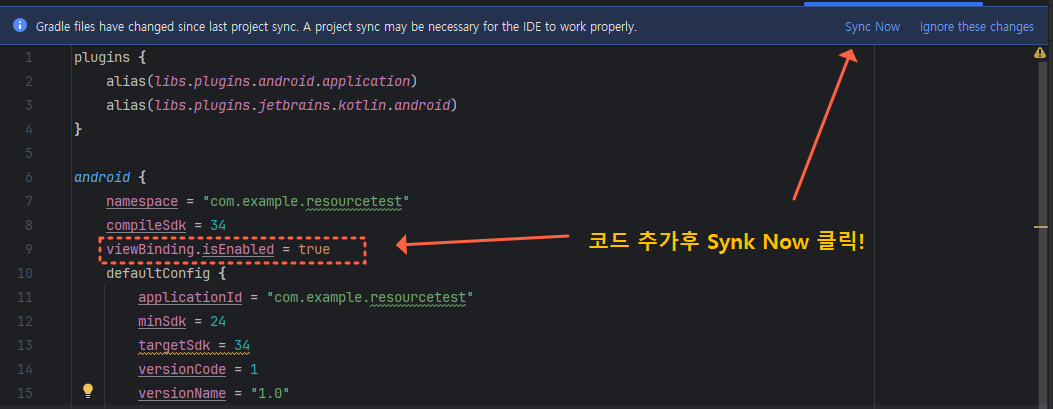
① 먼저 gradle에 있는 build.gradle.kts(Module :app) 파일에 아래처럼 뷰바인딩 사용 선언을 해주세요.
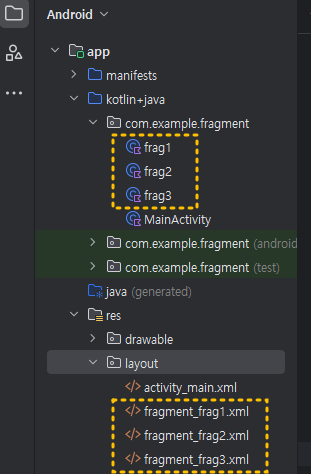
② 아래 이미지를 참고하여 res 》 layout 》 New 》 Fragment 》 Fragment(Blank) 를 클릭하고 타이틀은 frag1으로 입력하여 만들면 fragment_frag1.xml 파일과 함께 frg1.kt 파일이 세트로 만들어집니다. (layout에서 마우스 우클릭하면 New 메뉴가 나타납니다)
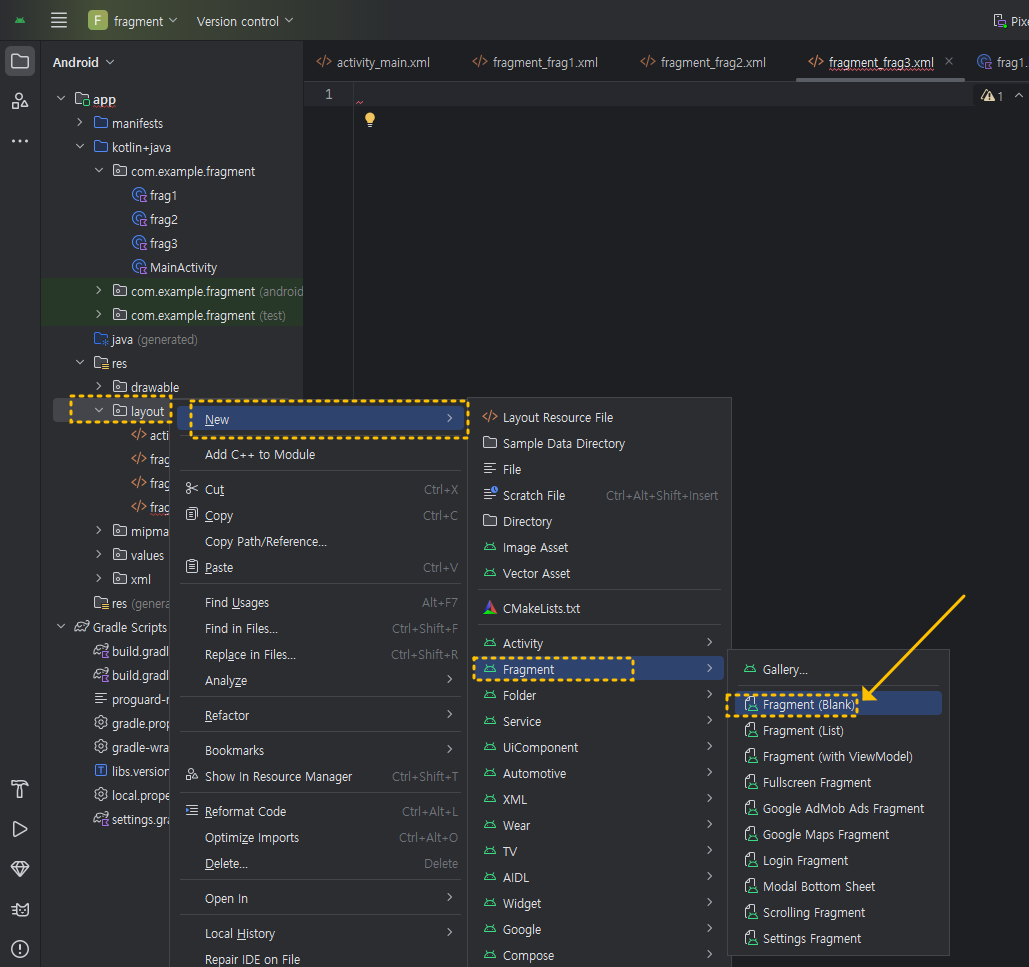
같은 방법으로 아래 이미지처럼 fragment_frag2.xml , fragment_frag3.xml ( frg2.kt , frag3.kt)을 만들어 주세요.
→ frag 1의 xml 코드는 아래와 같습니다. (단순하게 배경색 지정하고 TextView를 하나 넣었습니다)
<?xml version="1.0" encoding="utf-8"?>
<FrameLayout xmlns:android="http://schemas.android.com/apk/res/android"
    xmlns:tools="http://schemas.android.com/tools"
    android:layout_width="match_parent"
    android:layout_height="match_parent"
    android:background="#2233aa"
    tools:context=".frag1">

    <TextView
        android:id="@+id/txtview_frag1"
        android:layout_width="wrap_content"
        android:layout_height="wrap_content"
        android:layout_gravity="center"
        android:text= "Frag 1 page"
        android:textSize="20dp"
        android:textStyle="bold"
        android:textColor="@color/white"/>

</FrameLayout>
→ frag2의 xml 코드 또한 동일하며 배경색과 id 그리고 text 내용만 각각 바꾸어 주세요.
<?xml version="1.0" encoding="utf-8"?>
<FrameLayout xmlns:android="http://schemas.android.com/apk/res/android"
    xmlns:tools="http://schemas.android.com/tools"
    android:layout_width="match_parent"
    android:layout_height="match_parent"
    android:background="#A51EB4"
    tools:context=".frag2">

    <TextView
        android:layout_width="wrap_content"
        android:layout_height="wrap_content"
        android:layout_gravity="center"
        android:text= "Frag 2 page"
        android:textSize="20dp"
        android:textStyle="bold"
        android:textColor="@color/white"/>

</FrameLayout>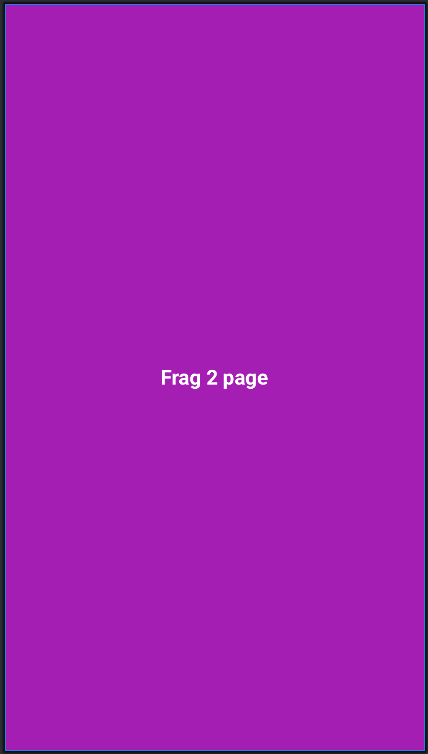
→ frag3의 xml 코드 또한 동일하며 배경색과 id 그리고 text 내용만 각각 바꾸어 주세요.
<?xml version="1.0" encoding="utf-8"?>
<FrameLayout xmlns:android="http://schemas.android.com/apk/res/android"
    xmlns:tools="http://schemas.android.com/tools"
    android:layout_width="match_parent"
    android:layout_height="match_parent"
    android:background="#FF9800"
    tools:context=".frag3">

    <TextView
        android:layout_width="wrap_content"
        android:layout_height="wrap_content"
        android:layout_gravity="center"
        android:text= "Frag 3 page"
        android:textSize="20dp"
        android:textStyle="bold"
        android:textColor="@color/white"/>

</FrameLayout>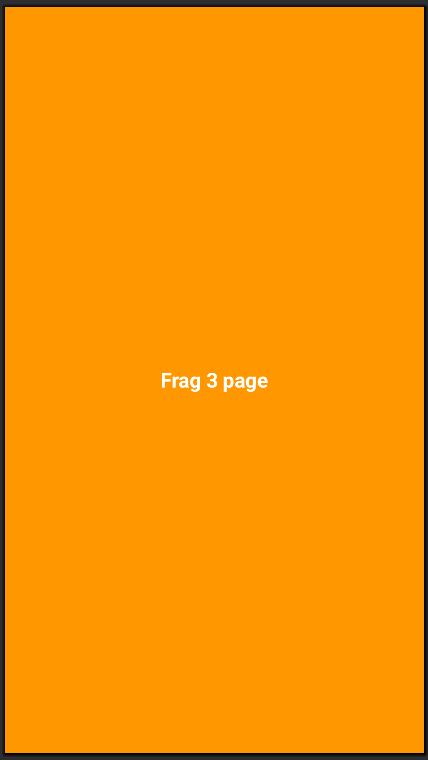
④ 자동으로 생성된 frag1.kt 프래그먼트의 클래스 함수 코드는 아래와 같습니다.
package com.example.fragment

import android.os.Bundle
import androidx.fragment.app.Fragment
import android.view.LayoutInflater
import android.view.View
import android.view.ViewGroup

// TODO: Rename parameter arguments, choose names that match
// the fragment initialization parameters, e.g. ARG_ITEM_NUMBER
private const val ARG_PARAM1 = "param1"
private const val ARG_PARAM2 = "param2"

/**
 * A simple [Fragment] subclass.
 * Use the [frag1.newInstance] factory method to
 * create an instance of this fragment.
 */
class frag1 : Fragment() {
    // TODO: Rename and change types of parameters
    private var param1: String? = null
    private var param2: String? = null

    override fun onCreate(savedInstanceState: Bundle?) {
        super.onCreate(savedInstanceState)
        arguments?.let {
            param1 = it.getString(ARG_PARAM1)
            param2 = it.getString(ARG_PARAM2)
        }
    }

    override fun onCreateView(
        inflater: LayoutInflater, container: ViewGroup?,
        savedInstanceState: Bundle?
    ): View? {
        // Inflate the layout for this fragment
        return inflater.inflate(R.layout.fragment_frag1, container, false)
    }

    companion object {
        /**
         * Use this factory method to create a new instance of
         * this fragment using the provided parameters.
         *
         * @param param1 Parameter 1.
         * @param param2 Parameter 2.
         * @return A new instance of fragment frag1.
         */
        // TODO: Rename and change types and number of parameters
        @JvmStatic
        fun newInstance(param1: String, param2: String) =
            frag1().apply {
                arguments = Bundle().apply {
                    putString(ARG_PARAM1, param1)
                    putString(ARG_PARAM2, param2)
                }
            }
    }
}
위 코드처럼 기본 생성된 코드 그대로 사용해도 실행에 문제는 없는데요, 필요 없는 내용 다 지우고 아래만 남겨 놓으면 됩니다.
package com.example.fragment

import android.os.Bundle
import androidx.fragment.app.Fragment
import android.view.LayoutInflater
import android.view.View
import android.view.ViewGroup

class frag1 : Fragment() {

    override fun onCreateView(
        inflater: LayoutInflater, container: ViewGroup?,
        savedInstanceState: Bundle?
    ): View? {
        return inflater.inflate(R.layout.fragment_frag1, container, false)
    }
}
frag2.kt 와 frag3.kt 코드도 마찬가지로 정리해 보세요.
⑤ activity_main.xml 코드는 아래처럼 작성해 주세요.
<?xml version="1.0" encoding="utf-8"?>
<androidx.constraintlayout.widget.ConstraintLayout xmlns:android="http://schemas.android.com/apk/res/android"
    xmlns:app="http://schemas.android.com/apk/res-auto"
    xmlns:tools="http://schemas.android.com/tools"
    android:id="@+id/main"
    android:layout_width="match_parent"
    android:layout_height="match_parent"
    tools:context=".MainActivity">

    <FrameLayout
        android:id="@+id/main_view"
        android:layout_width="match_parent"
        android:layout_height="0dp"
        app:layout_constraintBottom_toTopOf="@+id/linearLayout"
        app:layout_constraintEnd_toEndOf="parent"
        app:layout_constraintStart_toStartOf="parent"
        app:layout_constraintTop_toTopOf="parent"></FrameLayout>

    <LinearLayout
        android:id="@+id/btn_layout"
        android:layout_width="match_parent"
        android:layout_height="wrap_content"
        android:weightSum="3"
        app:layout_constraintBottom_toBottomOf="parent"
        app:layout_constraintEnd_toEndOf="parent"
        app:layout_constraintStart_toStartOf="parent"
        app:layout_constraintTop_toBottomOf="@+id/main_view">

        <Button
            android:id="@+id/btn1"
            android:layout_width="wrap_content"
            android:layout_height="wrap_content"
            android:layout_margin="5dp"
            android:layout_weight="1"
            android:text="1번"
            android:textSize="20dp"
            android:textStyle="bold" />

        <Button
            android:id="@+id/btn2"
            android:layout_width="wrap_content"
            android:layout_height="wrap_content"
            android:layout_margin="5dp"
            android:layout_weight="1"
            android:text="2번"
            android:textSize="20dp"
            android:textStyle="bold" />

        <Button
            android:id="@+id/btn3"
            android:layout_width="wrap_content"
            android:layout_height="wrap_content"
            android:layout_margin="5dp"
            android:layout_weight="1"
            android:text="3번"
            android:textSize="20dp"
            android:textStyle="bold" />
    </LinearLayout>

</androidx.constraintlayout.widget.ConstraintLayout>
⑥ 뷰 바인딩을 적용한 MainActivity.kt의 코드는 아래처럼 해주세요.
package com.example.fragment

import android.os.Bundle
import androidx.activity.enableEdgeToEdge
import androidx.appcompat.app.AppCompatActivity
import androidx.core.view.ViewCompat
import androidx.core.view.WindowInsetsCompat
import com.example.fragment.databinding.ActivityMainBinding
import com.example.fragment.databinding.FragmentFrag1Binding

class MainActivity : AppCompatActivity() {
    override fun onCreate(savedInstanceState: Bundle?) {
        super.onCreate(savedInstanceState)
        val binding = ActivityMainBinding.inflate(layoutInflater)
        setContentView(binding.root)
        binding.btn1.setOnClickListener {
            supportFragmentManager.beginTransaction().replace(R.id.main_view, frag1()).commit()
        }
        binding.btn2.setOnClickListener {
            supportFragmentManager.beginTransaction().replace(R.id.main_view, frag2()).commit()
        }
        binding.btn3.setOnClickListener {
            supportFragmentManager.beginTransaction().replace(R.id.main_view, frag3()).commit()
        }
    }
}
위 코드에서 supportFragmentManager 코드에도 바인딩 기능을 적용하면 아래와 같이 하면 됩니다.
그리고, 각 버튼을 클릭할 때 마다 LinearLayout의 배경색도 따라 바뀌도록 아래처럼 코드를 추가해 줄 수 있어요.
"binding.linearBtnbox.setBackgroundColor(Color.parseColor("#2233aa"))"
package com.example.fragment

import android.os.Bundle
import androidx.activity.enableEdgeToEdge
import androidx.appcompat.app.AppCompatActivity
import androidx.core.view.ViewCompat
import androidx.core.view.WindowInsetsCompat
import com.example.fragment.databinding.ActivityMainBinding
import com.example.fragment.databinding.FragmentFrag1Binding

class MainActivity : AppCompatActivity() {
    override fun onCreate(savedInstanceState: Bundle?) {
        super.onCreate(savedInstanceState)
        val binding = ActivityMainBinding.inflate(layoutInflater)
        setContentView(binding.root)
        binding.btn1.setOnClickListener {
            binding.linearBtnbox.setBackgroundColor(Color.parseColor("#2233aa"))
            supportFragmentManager.beginTransaction().replace(binding.frameLayout.id, frag1()).commit()
        }
        binding.btn2.setOnClickListener {
            binding.linearBtnbox.setBackgroundColor(Color.parseColor("#A51EB4"))
            supportFragmentManager.beginTransaction().replace(binding.frameLayout.id, frag2()).commit()
        }
        binding.btn3.setOnClickListener {
            binding.linearBtnbox.setBackgroundColor(Color.parseColor("#FF9800"))
            supportFragmentManager.beginTransaction().replace(binding.frameLayout.id, frag3()).commit()
        }
    }
}
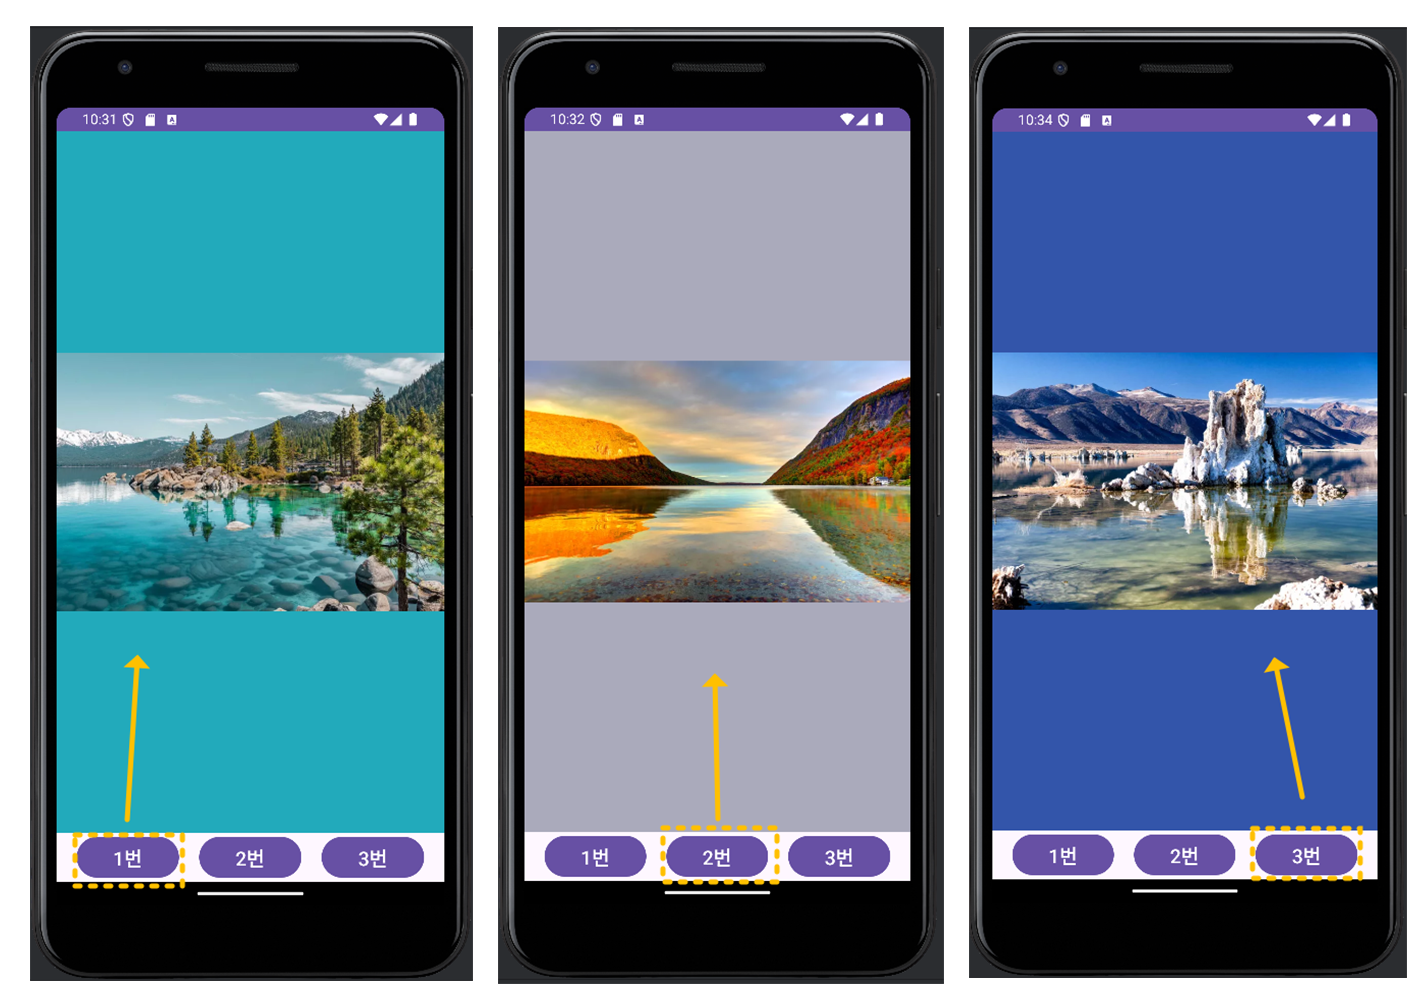
이렇게 까지만 하면 작성이 완료되고 실행해 보면 아래와 같이 실행이 되는 것을 볼 수 있습니다.
마지막으로, 살짝 응용해서 TextView 대신 이미지 뷰(ImageView)를 넣어 사진을 보여주는 것으로 바꾸어 볼게요.
그럼, 변경할 곳은 fragment_frag1.xml 파일에서 TextView 대신 아래와 같이 ImageView 를 대체해서 넣어 주면 됩니다. 나머지 fragment_frag2.xml 과 fragment_frag3.xml 파일도 동일하게 바꾸어주세요.
<fragment_frag1.xml 파일 코드>
<?xml version="1.0" encoding="utf-8"?>
<FrameLayout xmlns:android="http://schemas.android.com/apk/res/android"
xmlns:tools="http://schemas.android.com/tools"
android:layout_width="match_parent"
android:layout_height="match_parent"
android:background="#ffaaff"
tools:context=".frag1">
<ImageView
android:layout_width="wrap_content"
android:layout_height="match_parent"
android:src="@drawable/lake1"
android:background="#22aabb" />
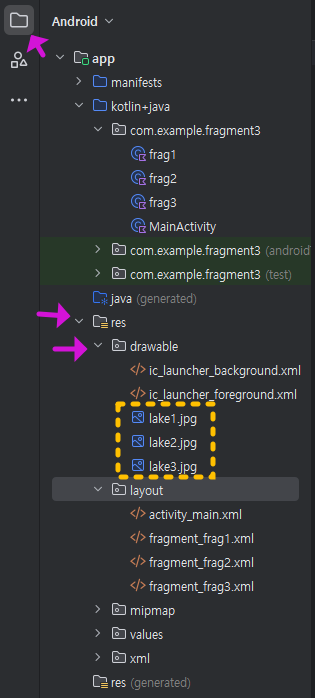
</FrameLayout>이때, 보여줄 사진으로 호수(lake)사진을 넣었는데요, 첨부해 드릴테니 연습으로 해보세요.
사진 파일들은 안드로이드 스튜디오의 프로젝트 탐색창에서 , res 》 drawable 폴더로 복사해 넣어주세요.
(아래 참고) 직접 끌어다 넣기하거나 , 복붙해도 됩니다.
아래는, 이미지로 대체해서 실행한 모습입니다.
사진이 없는 배경의 공간은 기본값인 흰색인데, background 배경의 색을 사진과 잘 어울리게 넣어서 채워봤습니다.
그럼, 지금까지 안드로이드 스튜디오에서 kotlin으로 프래그먼트(fragment)를 사용하는 방법과 실제 예시를 설명해 드렸습니다. 몇 번 반복적으로 연습해 보면 금방 응용할 수 있을 거예요.
감사합니다.
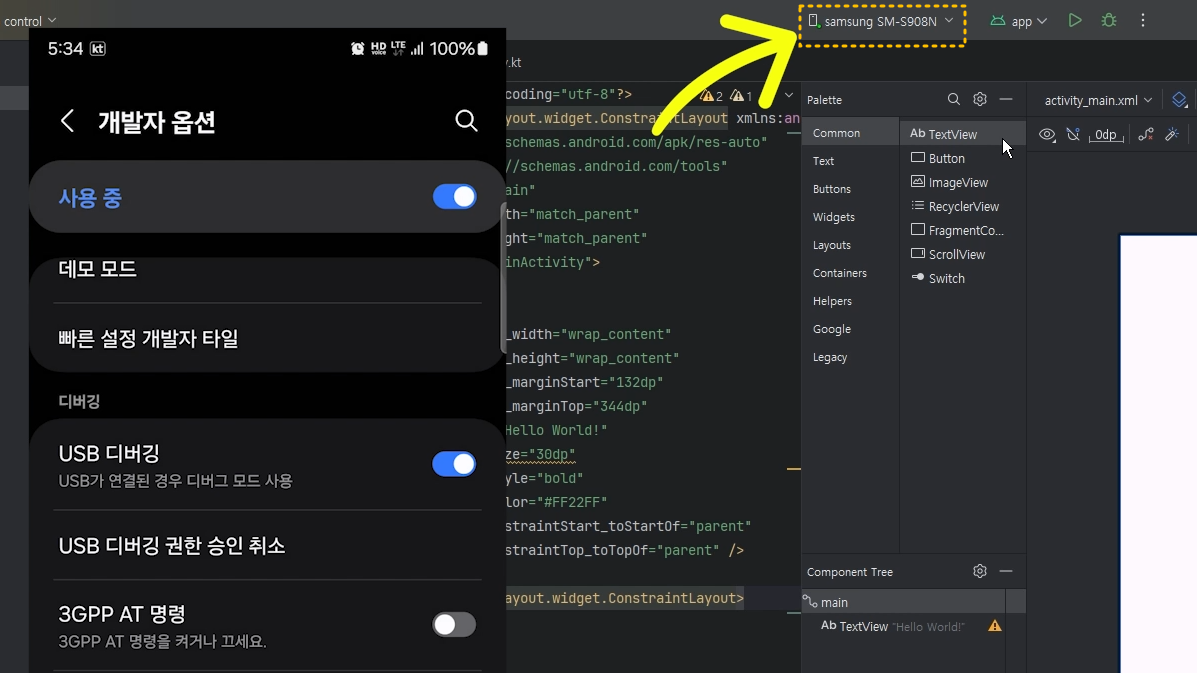
'App개발 > Android_Studio' 카테고리의 다른 글
| 【AndroidStudio】 gradle 관련 에러 해결하기! (2) | 2024.09.10 |
|---|---|
| 【AndroidStudio】 기본 버튼 스타일을 다양하게 바꾸어 보자~! (1) | 2024.09.09 |
| 【Android Studio】 Intro 인트로 화면 만들기 (코틀린) (0) | 2024.09.07 |
| [Android Studio] VIew Binding - 뷰 바인딩으로 바꾸기 (코틀린) (0) | 2024.09.06 |
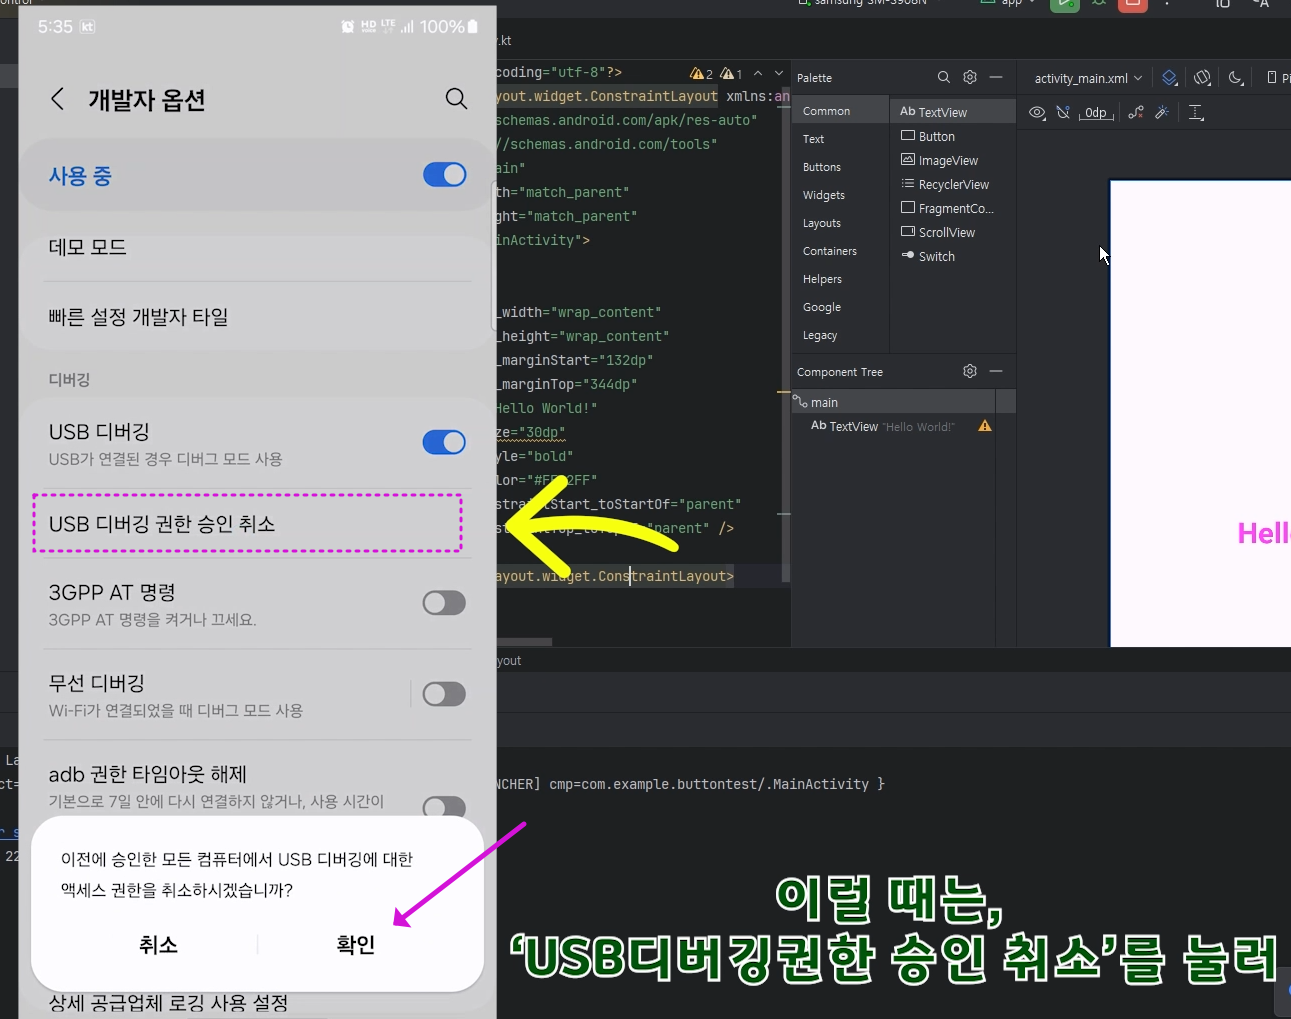
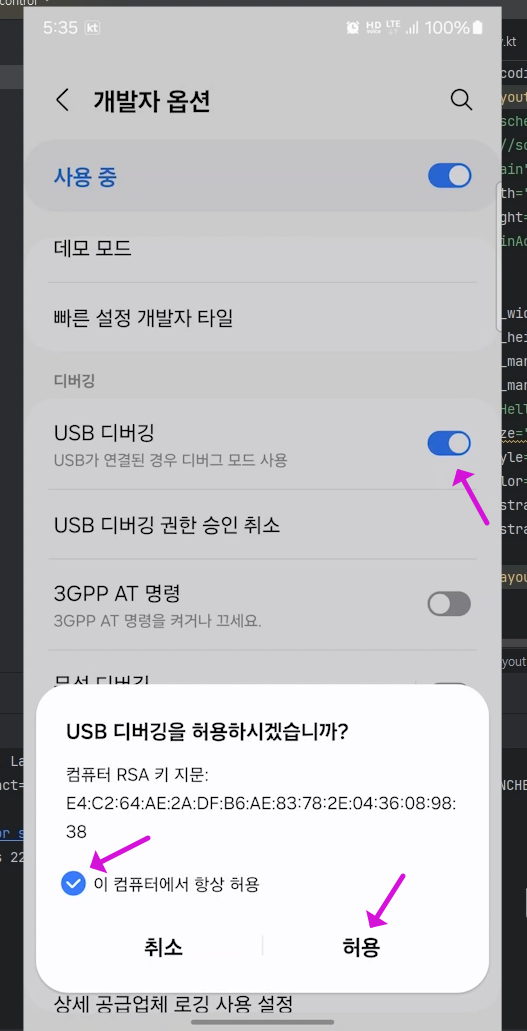
| 【트러블슈팅】 개발프로그램에서 스마트폰과 연결이 안될 때! (1) | 2024.08.12 |